9.23.2011

Mississippi Queen

Hello belles! This post has been a long time coming and I'm so excited to share some hair-tricks with you! Today's 'How-To' is all about those effortless curls that make the gent's head turn.

It takes about 30 minutes and is a perfect way to do your own hair on the big day (or just about every day if you're me).

Ready. Set. Start Your Irons!

I use a 1.5 inch curling iron. The curls seem to stay longer than with a larger barrel.

Let towel dry for about 10 minutes. (I usually do my make-up while I wait)

Blow-dry upside down until completely dry. (My hair holds curl better when it's clean but if yours is different skip the first two steps)

Pull half of your hair up. Spritz hair with medium hold hair spray before curling.

Begin at the root, slowing feeding hair through by slightly unclamping the iron. Check out the video below if it's not making sense. 

 
 If you can't view this video, click here.

Hold iron for about 5-10 seconds. Always curl away from your face.

Flip head and shake hair out at the root. (so you don't have those perfect 'prom curls')

Run fingers through to loosen curls. (If your hair doesn't hold curl well, you may want to skip this step)

Final product!

Pin a few pieces under layers to keep out of face. (Advised for the wedding day so you aren't constantly pushing hair back or behind your ears)

For extra volume and stay hold bottom of curls and use a comb to tease upward.

Now all that's left to do is get'cha model on! So whip that iron out, slap on some Pink & Proper lipstick and hit the town (or isle)!


Love,
Your Mississippi Queen

Blog of the Weekend: Carolina Love written by my sweet friend, Dania Alshafei. She gives you all the deets on life, style, travels, and cooking (ah...her cooking). If there is anything I miss about South Carolina it's Dania's cupcakes and late night dance choreography. Enjoy bellas!
9.22.2011

One thing that absolutely makes my day is when sweet belles send me videos that they know would be perfect for this blog! Well, this one is definitely a treat.

As you all know...I'm a weeper. And, to make me not feel so lame I like to post videos that make you weep with me. My favorite part is in the first minute and 30 seconds. Take a look...


Ryan Sutton

What an incredible man of God, right? Shout out to Sarah Freese for the recommendation! Hair tutorial coming with next post! Stay tuned!

9.20.2011

Signed, Sealed, Delivered.

Tis' the season...It's about every day that I am getting cutesy little invites that make my heart a'flutter. Since I eat this stuff up, I leaped at the chance to help Lauren Poche assemble her invitations! Had I known that I would rub my fingertips raw, I may have reconsidered (yea, right).


Here is the awesome thing about this chick's invitations. They were printed from a circa 1900 printing press by Blue Note Press. I know, I know...fresh faces like us don't know what I'm talking about so let me use a little technology to show you.


It's pretty incredible right? Every invitation is hand-feed. Total lost art in our high-paced society! But, I'm telling you, check out this place. Great prices and even better products! So let's get to the final product...


Do you love or do you love? Now on to Princess Lauren's shower invitations. These just have me tickled!
(Tea Luncheon, Lingerie Party, and Bridal Shower)


Last but certainly not least is my beautiful friendy, Kate's wedding invitations. Simple, lovely, and all together perfect. Loving the text and lone heart!


I hope these beautiful prints pressed your heart as they have mine! And don't forget to send an invite my way when it's your day! I'm ready to parrr-tayyy!

9.18.2011

Now We're Engaged! Wooo!

Belles...go grab the Puffs Plus before hittin' play. As promised in an earlier post, this is the video of Carly and Jackson's engagement!

I always like to know the 'inside deets' before stuff like this so allow me to fill you in on some background information.

Carly and Jackson went with Carly's mom, Lori and Brooke (she recorded everything!) to see her two brothers play baseball in Jersey.

Before the game they planned to go to the Empire State Building but Carly wasn't feeling well (you will notice her "excitement" in the beginning of the vid). After her whining, the others managed to get her out of the hotel and on to a pretty stinkin' perfect day!

As they get to the top of the Empire State Building you will notice Jackson talking to Carly, kneel, and then they hug...Now here's the best part...minute 2:06 when my girl (after my own heart) pulls away to check out her ring! Perfection!

Now, at minute 3:34 she is getting off the phone saying "I'll have to call her downstairs." That 'her' she was talking about was me! Yep, there wasn't much service at the top (go figure) so all I heard on the phone was, "Emily! Guess what?" Indeed, she left me hanging for a solid 5 minutes while I was sweatin' it out in Louisiana!

As they got downstairs, Jackson surprised her with a limo and soon tells you the story of the engagement. All you southern girls prepare for Jackson's accent. It will make.you.melt.

So without further adieu...Let's roll the tears...


Just perfect, right? Now we can all go to bed with a little more love in our hearts...or possibly a little jealousy in our veins. Ahh...the romance.

9.14.2011

You Red My Sole...

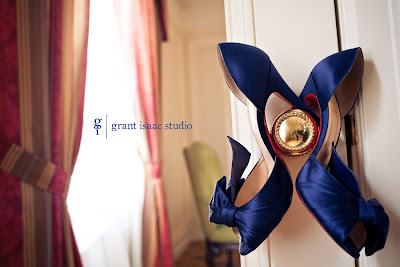
Grant Isaac Studio, blue Christian Louboutins

Hello my budgeting belles! I've got a money saving tip that will amp up your wedding digs and make you look like a million bucks (or at least $875). I know we've all adored a pair of Christian Louboutin's from afar so now it is time to get'cha some!

I have pair of patent leather shoes that I was just...over. Lately I have been bypassing the boring and grabbing my nude pumps and strappy wedges. It was only fair that I gave my little black shoes a makeover! So here's how it all went down...

I started by sanding the bottom for ultimate adhesion, sectioned off the soles with painter's tape, and began with acrylic, primer paint.


I needed about 3 coats of True Red acrylic paint before applying 2 layers of Mod Podge (for super shine and protection)! This was the final product...


This belle spent $25 on this project, including the shoes! Here is the real thing-Yep, all $875 worth...


So go out...get an awesome pair of pumps and pump them up! Now that you know my little secret, it's time to make your own!

Remember belles...
 Keep your head, heels, and standards high!

9.08.2011

Now I will be the first to admit that this song is o.v.e.r. p.l.a.y.e.d. but you've got to check out this video! I sure do wish I was a guest at this wedding! So fun!

9.04.2011

Here's Her Happy!

Hello belles and beaus! I'm sure many of you are in my boat...You know, the boat that sails to your best friend's engagement? And you always ponder...What to give her to say congratulations! Well, I hope to hit you up with some ideas tonight so let's get this par-tay started!

Lucky for y'all, I not only have an answer but I've got pics and directions to boot! Before I continue, keep in mind that the gift box below was made for my newly engaged, best friend (and yes, I got a little carried away). These are a few ideas that can be broken up into single gifts! Here we go...

I started at Hobby Lobby (craft stores are my worldly heaven), picked up a cardboard hat box, craft paper, canvas, burlap, and buttons. I also hit up Home Depot for white floor tiles (.16 a piece! Whoop Whoop!) This is what became of my purchases...

A box that Carly could hold all her wedding deets in 
How to: (1) Tear pieces of craft paper (2) Dip paper in water for two seconds and place aside (3) Coat a small area on the box with Elmer's glue (4) Place craft paper on glue, bunch to create uneven surface (5) once entire box is complete cover with two layers of Mod Podge for a protective gloss finish

Time: Only took me about 20 minutes (excluding Mod Podge finish) - 40 minutes total

Since my girl's monogram will soon change I wanted to give her little crafty coasters to celebrate!

How: (1) Coat plain tile with thin layer of Elmer's glue (2) Cut craft paper to size and place on top. (3) I used an X-Acto knife to cut out the letters, placed glue on backs and smoothed on top of paper (4) Three coats of Mod Podge (5) Hot glue thin cork board on bottom

Time: Entire project about 1 hour

A simple canvas to showcase her new last name with glittered buttons! (Picture doesn't do it justice)

How: (1) Canvas covered in burlap using hot glue gun (2) Spray adhesive the buttons and instantly sprinkle glitter (3) Place buttons where you like and hot glue them to canvas. (4) Simple tied ribbon attached to back with hot glue

Time: 1.5 hours (buttons took a while to dry completely)

Definitely hook her up with some new wedding mags! I also included some honeymoon and cooking magazines! (30 Minute Meals rocks!)

I had to hook the groom-to-be with a little somethin'-somethin' so I went to a local pastry shop and grabbed some wedding cake cupcakes. Yum to my Tum!

Lastly, top off your gift with some cutesy stationary! I got this card from a local shop downtown. How perfect?

I hope this helps you kids out in the future! Have a fantastic weekend and get'ta craftin'!

Love,
Belle of the Blog